
A successful import of your contacts into Captivated starts with well-organized, clean and accurate data. Before importing your contacts into Captivated, check out these Excel tips and tricks.
Once you have clean and accurate data, scroll down to learn how to complete the contact import.
1. Split a cell
If your customer file has the contacts’ first and last name within one column, you can use a simple process to split the first name into one column and the last name into another column. For a successful import into Captivated, you must have first name and last name in two separate columns. This is important so that when you use {{salutation}} it will pull just the contact’s first name making it appear more personal and less robotic.
Step 1: Insert a new column to the right of your “Name/Full Name” column if you don’t have one already.
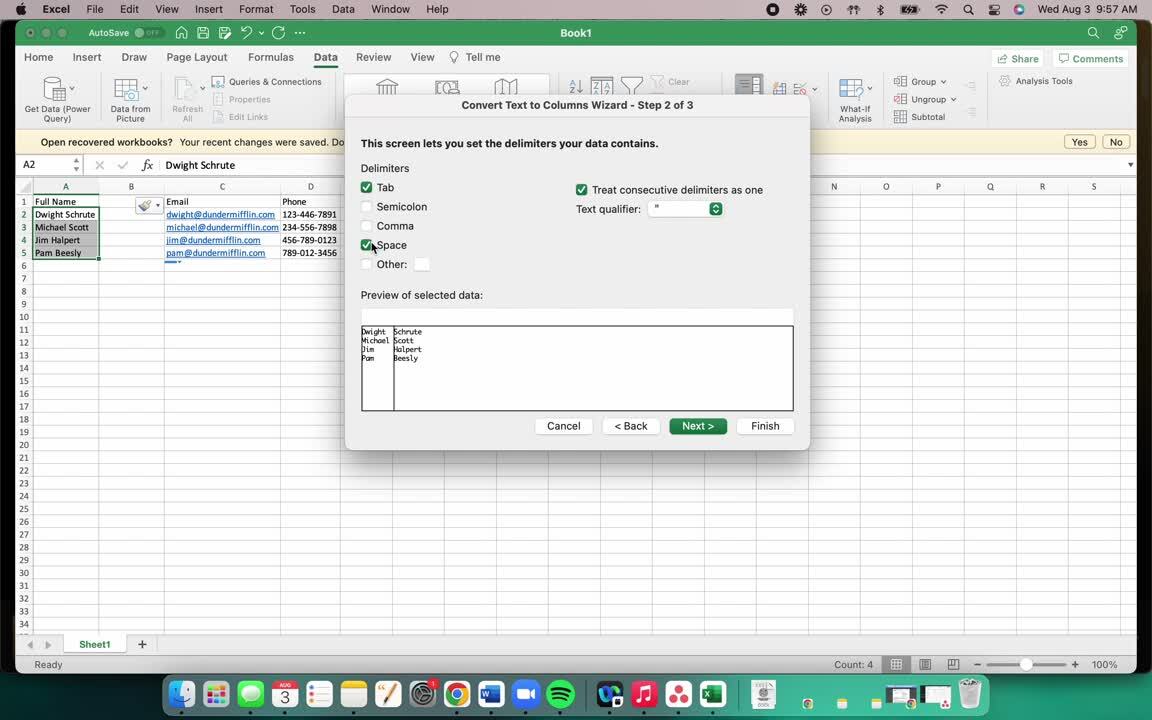
Step 2: Choose the Name column. In the data ribbon menu, choose Text to Columns.
Step 3: In the next box, select the Delimited button and then click next.
Step 4: Check the box next to the character you want to split up the name. For example, choose space.
Step 5: Click finish
2. Remove capitalization
If your contacts’ first and last name are in all caps, you can use the Excel PROPER formula to change the first letter of the name to be capitalized and all other letters lowercase. This is important so that when you use the {{salutation}} field in templates, it appears as a personal text message versus a computer-generated text.
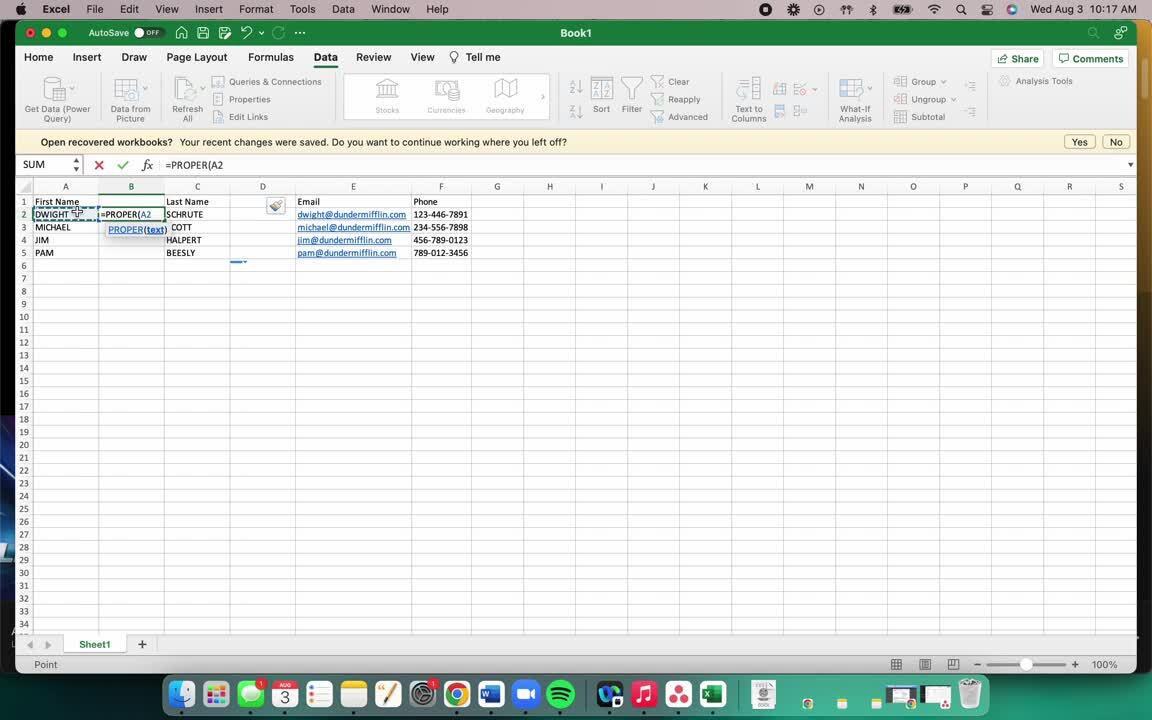
Step 1: Insert a new column to the right of your full name column if you don’t have one already.
Step 2: In the first cell of the empty column, type the Excel PROPER formula: =PROPER
Step 3: Point this formula to your data by clicking into the adjacent cell in the column to the left. Once you do this, the data will populate in the cell of the empty column.
Step 4: Click the cell and drag the formula down in the empty column.
3. Locate import phone number from multiple phone numbers
Sometimes, you may have several phone numbers for a customer. For example, home phone, cell phone, business phone, other phone etc. However, for a successful import into Captivated, we need the mobile number only for texting purposes. There is an Excel IF/THEN formula you can use to pull the appropriate phone number.
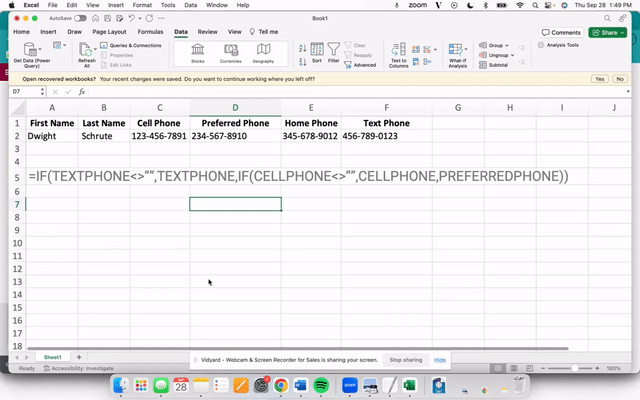
Step 1: Insert a column to the left or right of all of your phone number columns and name the column “import phone”.
=IF(TEXTPHONE<>””,TEXTPHONE,IF(CELLPHONE<>””,CELLPHONE,PREFERREDPHONE))
Step 3: Hit enter. Drag the formula down the column to apply it to all numbers.
4. Remove names from a phone number column.
Step 1: Insert at least one column to the right of the column that has phone numbers with names in the column.
Step 2: Highlight the column of phone numbers that have names.

Administrator Contact Import Video Walkthrough
Administrator Contact Import Step by Step Instructions
Both administrators and non-admin who have been granted access to import contacts can bulk import up to 10,000 contacts into their contact list.
Administrators can do so under the Administration section > Import Contacts.

After you have cleaned up your .CSV file with UTF-8 encoding with the steps above, select your file and make sure to choose contact ownership settings.
Note: your CSV spreadsheet needs to have titles/headers for each column
Make sure to pay attention to the three starred sections and choose to either “update” or “do not import” and “add” or “replace” existing notes and/or tags.
Adding = adding to the notes or tags that are already tied to the contact
Replace = removing what is currently there in the notes or tags and replacing it with what is on the current spreadsheet

- You must select where you’d like to map your columns from the dropdown list; if you don’t select something for the column, the row will be ignored.
- You can map your data to the following fields within Captivated: Prefix, First Name, Last Name, Suffix, Salutation, Company Name, Phone Number, Email, Tags, and Notes.
- Note: The following fields are searchable in Captivated: First Name, Last Name, Company Name, Phone Number, Tags.

After you hit import, a green banner will appear at the top of your screen indicating the number of contacts that were imported.
Non-Administrator Contact Import Video Walkthrough
Non-Administrator Contact Import Step by Step Instructions
Non-administrators who have access to import contacts can do so under the “Contacts” section of Captivated. Follow the same instructions as above to import your .CSV.

If you are not seeing the option to import contacts, you can check with your Captivated Administrator to have this functionality turned on for you. Not sure who your administrator is? You can reach out to our Support team to find out.
Administrators, you can turn on this functionality for non-admin users under “Administration” > View Users > User Name > Edit > Advanced Settings > Contact Import.

Likely due to the file being saved as an .xlsx instead of .csv with UTF-8 encoding. Navigate to your spreadsheet and hit file > save as > choose .csv with utf-8 encoding.
This could be for several reasons:
1. The first name, last name and mobile number columns weren’t mapped appropriately.
2. There were letters in your phone number column in Excel
A tag is a way to easily group your contacts together to send an announcement.
Not every organization has contact ownership turned on. If you would like to have this enabled, please reach out to the administrator of your account and have them reach out to Captivated support.
Your Captivated administrator does not have this functionality turned on for you. Reach out to them and ask to give you this permission under your user in Captivated or have your admin reach out to Captivated support.
- Questions? You can chat with Captivated Support via the left-hand menu or text Captivated Support at 317.316.3600